Multiple email accounts can be set up on Windows Live Mail including Hotmail, Gmail, Yahoo!Mail and other email addresses from your ISP or web sites. On this page I show you how to add a Gmail account on Windows Live Mail and store all those emails on your computer.
Open a browser window and log in at your account. Click the "Settings" link on the top right.

Now click the "Forwarding and POP/IMAP" link which opens the different options for forwarding, POP download and IMAP access.
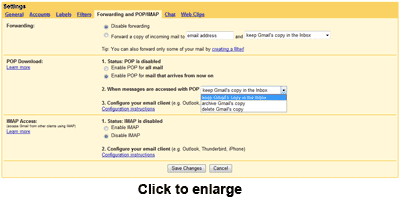
In the POP download section, choose the option of enabling POP for all mails or only for those that arrive from now on. Also select the option of whether you want to keep the email message in Gmail's inbox, archive or delete it. Once you have made your choices, make sure you click the "Save Changes" button at the bottom.
Click on the "Add an e-mail account" button/link located left (refer image below) or go to "Tool" -> "Accounts", click on the "Add" button and select "E-mail Account" in the "Add an account" window.

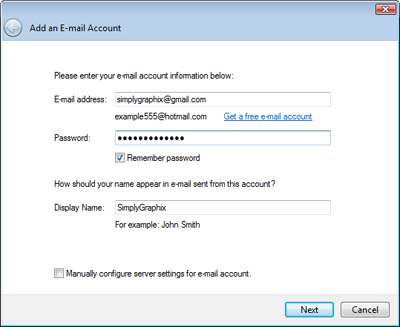
In the popup, enter your full email address, your password (do keep the "Remember password" box checked), your display name and hit the "Next" button. Yes, it is that simple - you don't need to configure any servers manually.
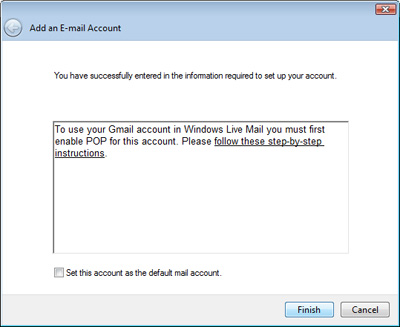
Windows Live Mail will then inform you that you need to enable POP at your Gmail account - but we have already done that in the first step above so you can simply click on the "Finish" button. By the way, if you are a prolific user of Gmail, I also suggest you set it as the default account by checking "Set this account as the default mail account".
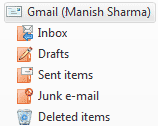
Your Gmail account will now be setup on Windows Live Mail email client and will appear with its five folders - Inbox, Drafts, Sent Items, Junk e-mail and Deleted Items.
The source of the problem is the blocking of outgoing email server port 25 is blocked by most ISPs. The solution is to change this outgoing port number to 465 or 587 which should solve the problem for good.
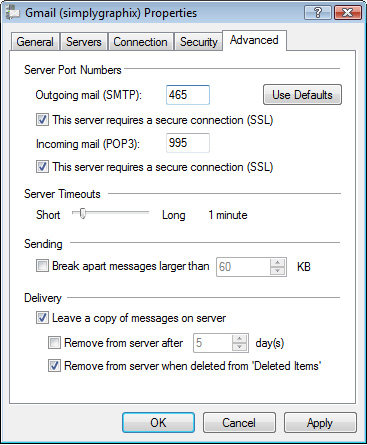
Click on the "Advanced" tab to bring it to the front. In the " Outgoing mail (SMTP)" text field, enter 465 or 587. Click on the "Apply" button followed by the "OK" button. FYI, you can also configure the various options under "Delivery" such as removing the emails from the Gmail server once you delete them from Windows Live Mail or opt in to leave the emails on the server forever.
Lastly, make sure that "My server requires authentication" option is checked under the "Servers" tab.
Enabling POP3 on the Gmail account
The very first thing you need to do is enabling POP3 access of your Gmail account.Open a browser window and log in at your account. Click the "Settings" link on the top right.

Now click the "Forwarding and POP/IMAP" link which opens the different options for forwarding, POP download and IMAP access.

In the POP download section, choose the option of enabling POP for all mails or only for those that arrive from now on. Also select the option of whether you want to keep the email message in Gmail's inbox, archive or delete it. Once you have made your choices, make sure you click the "Save Changes" button at the bottom.
Adding the Gmail account on Windows Live Mail
Now that you have configured your Gmail account for POP access, it's time to add and setup your Gmail account on Windows Live Mail. Start the email client (if not already running).Click on the "Add an e-mail account" button/link located left (refer image below) or go to "Tool" -> "Accounts", click on the "Add" button and select "E-mail Account" in the "Add an account" window.
In the popup, enter your full email address, your password (do keep the "Remember password" box checked), your display name and hit the "Next" button. Yes, it is that simple - you don't need to configure any servers manually.

Windows Live Mail will then inform you that you need to enable POP at your Gmail account - but we have already done that in the first step above so you can simply click on the "Finish" button. By the way, if you are a prolific user of Gmail, I also suggest you set it as the default account by checking "Set this account as the default mail account".

Your Gmail account will now be setup on Windows Live Mail email client and will appear with its five folders - Inbox, Drafts, Sent Items, Junk e-mail and Deleted Items.

Common problem - Gmail setup on Windows Live Mail: cannot send emails
One common problematic issue arises after the Gmail account set up on Windows Live Mail which is sending emails. This, as you can understand, is quite serious hitch because an email account that is not able to send out emails in quite useless. Fortunately, this issue can easily be solved by tweaking the Gmail account properties in Windows Live Mail client. If you too are facing this problem, refer the section on configuration of the Gmail account below.The source of the problem is the blocking of outgoing email server port 25 is blocked by most ISPs. The solution is to change this outgoing port number to 465 or 587 which should solve the problem for good.
Configuration of Gmail account on Windows Live Mail
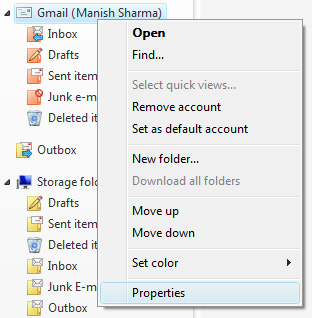
If you are not able to send out emails from the Gmail account added to Windows Live Mail email client, you need to change or configure its properties to reflect the correct email outgoing server port number. To do this, right-click on your Gmail account in Windows Live Mail and select "Properties" from the drop down.
Click on the "Advanced" tab to bring it to the front. In the " Outgoing mail (SMTP)" text field, enter 465 or 587. Click on the "Apply" button followed by the "OK" button. FYI, you can also configure the various options under "Delivery" such as removing the emails from the Gmail server once you delete them from Windows Live Mail or opt in to leave the emails on the server forever.

Lastly, make sure that "My server requires authentication" option is checked under the "Servers" tab.


No comments:
Post a Comment